
Photography Tips 101: From Beginner to Professional
This list of the 101 Most Essential Photography Tips is a must for every beginner photographers.
“We listed the items from Beginner to Professional, starting at number 1 and going up as you read.” Although those tips can be used on DSLR cameras, the majority of them can also be applied to most small mirrorless cameras also.
1-Put the largest and fastest memory card your camera can accept:
Memory cards are cheaps, buy large and fast ones. If you also want to make videos, you will need a lot of them.
2-Set your camera for largest image & video resolutions:
Time will pass and soon you will regret not to have done so earlier. One day, you will need your image for a project or a family printout. That day, you will regret not having images at the maximum resolution your camera can provide.
3-Set the correct hour and date on your camera:
Your camera is recording dates on each images you take. You normally store your images by date, but if it’s not set properly, you might end up with a messy chronological storage. Not very useful.. ????
4-When you first use it, just put your camera in full automatic mode:
In the beginning, when you’re not comfortable with your camera, it’s always best to set it in automatic mode. You can always change this back later on.
5-Learn to hold your camera properly:
You may have a finger in front of the lens or blocking the flash. It may also be the camera strap. Just find the best way to hold it right.
6-Learn to use the shutter button:
The shutter button has two functions; the half-press is for the camera Focus, and the full-press is to take the picture. You focus on your subject, hold it halfway to do your composition, then press it fully to take the shot.
7-Which focus point should you use:
The central one will always give the best focused images, but you have to know how to select other ones just in case.

8-Shoot in color:
You can always remove color later. If you shoot in black and white, you won’t be able to put back colors if you change your mind.
9-Do not move:
The most common mistake people make when taking a picture is “moving the camera while pushing the trigger“, just be careful when you push it. It’s also a good idea to hold your breathing when shooting, the lesser you move the better. Nothing ruins a photo faster than it being blurry, you just can correct it afterward. You can also lean on a tree or wall to stabilize yourself.
10-Set the Orientation Right:
Generally speaking, landscapes and group photos are better in horizontal, and People Portraits better in Vertical. You can change this later on when you’ll be more comfortable with composition techniques.

11-Don’t be afraid to shoot many times:
You can always delete bad pictures later. Shoot Shoot Shoot !!! Just don’t forget to check the result in the monitor in between..????
12-Learn how to activate or desactivate the camera internal flash – and turn it off.
 Most of the time, it’s better to just turn it off. Professional camera don’t even have a built-in flash. The reason is simple, it just doesn’t make good pictures. Its symbol is a small lightning.
13-Learn how to activate or desactivate your camera «Macro» setting:

The Macro mode is used to make close-up on something small, it’s represented by a small tulip flower. Very useful..????
14-Learn to use the camera timer:
 The camera timer is useful when you want to be in the picture, or when you shoot at night with a tripod.
15-Understand the rule of thirds:
You divide your image with vertical and horizontal lines at thirds of the image, then compose your image to have your subject along one of those lines, or at the points where they intersect.

A picture composed with the rule of thirds is more interesting and pleasing to the eye. The rule of thirds is based on the idea that pictures are better balanced, when they are not centred.
16-Set your camera to see rules of thirds lines.
In most cameras, you can activate the rules of thirds lines on the LCD screen. In the beginning, it’s good to have something to remind us of this rules. With times, it will come instinctly and you won’t need it anymore.
17-Know what the histogram is and how to interpret it:
It tells you if your image is too dark, too bright, oversaturated or blown out by light.

This Photography site explains it in more detail, probably much better than we could.
18-Buy a second battery :
Batteries have a tendency to be discharged at the wrong moment, get another one, just in case.
19-Charge your batteries
Don’t assume your camera’s batteries are fully charged, make sure they are before leaving home.
20-What is noise?
You can see the Noise when you look at an image very closely. It is more visible on dark areas, at high ISO settings. Like Below:

21-Get a second memory card :
Memory cards sometimes fails. When you’re far from civilisation, it’s not time to look for a memory card if the first one fail or is full.
22-Read your camera manual :
Once you’re starting to feel comfortable using your camera, it’s time to know it a bit more in detail. Had you read it at the beginning, you probably would been overflowed by the informations, and get a headache more than anything else. Reading it when you already know the basic camera functions and settings help you analyse the information more efficiently.
23-Get a good micro-fiber cloth:
Get a good micro-fiber cloth, the bigger the better, and get more than one. We use the Optex orange cloths, we have one for the camera lenses, one for the glasses and even one to clean car windshield Interiors. Keep them all in ziploc bags, so they don’t get stained accidently.
24-Keep your camera with you most of the time:
You never know when a good photo opportunity is going to come up, you might see an OVNI today or “Nessy” the Loch Ness Monster..
If you don’t have your camera, take time to find new things and new places to shoot. Also find at what time you should come back to shoot it; Sunset,sunrise or else. That’s what we (photographers) call “scouting”..
25-Get a good tripod:
If you serious with photography, get a very good tripod from the start. We have about 6 tripods, but only use 2, one small for trip and a big expensive one for everything else. They are lightweight and efficient, and we could just burn the others 4.
Our best one is a Manfrotto like the one below, it’s in carbon fiber so it’s lightweight, it has a locking ball at the top and fast easy clips on the legs. We love it, it’s all you will ever need !! ????

26-Understand the 1/1 mm/time ratio:
Professional photographers use this ratio to know the shutter speed required for each lens they use. It’s the limit a person can take a sharp photo while holding the camera. If youre using a 100mm lens, then your shutter speed should be at 1/100th of a second or faster.
Ex: 1/22sec for 22mm, 1/300sec for 300mm, and so on.
You also have to consider the crop factor of the camera below.
27-What is the camera sensor crop factor:
A normal SLR use a full 35mm wide sensor. A sensor with a crop factor of let’s say 1.5 is smaller than the 35mm by a factor of 1.5. ( 35mm/1.5 = 23mm ). The mm/time ratio also have to be modified when using a camera with a crop factor. A 50mm lens become a 75mm lens when using a 1.5 crop factor, so you have to shoot at 1/75s instead of 1/50s as on a full frame camera (full 35mm).

This article explains it all in more details.
28-Use a tripod whenever it’s possible:
Images will always be crisper when using a tripod. You might not see it visually, but they are sharper. You also have to disable the image stabilizer on the camera or lens, since it add vibrations with a tripod.
29-Use the LCD Magnification:
To make sure your image is well focused, zoom your image on the camera display. My camera allow me to zoom 10X, it’s way better than my eyes can see thru the viewfinder.
30-Safety, Safety, Safety:
Especially in India, where people tend to get killed while doing selfies. Some were struck by trains doing it, be careful.
31-Understand the difference between MPixel and Mbytes:
Should a picture size in bytes be the same as the pixel count? Yes and No. The difference is the compression factor. Compression was created to make image size smaller so it takes less place in memory. The only problem with compression is that it affects the image quality, you have to be aware of it.
An Uncompressed 21 Mpixel 8 bits image would normally take 21 Mbytes, that’s huge compared to the same image in top quality JPG at 8.5Mbytes.
Here’s some image sizes in Mbytes for the same 21 mpixel image but in compressed format:
-
PNG: 19.1 MB
-
GIF: 4.82 MB
-
Jpg – quality 12: 8.52 MB
-
Jpg – quality 8: 1.8 MB
-
Jpg – quality 4: 0.859 MB
-
Jpg – quality 1: 0.508 MB
As you can see JPG give much smaller image sizes.
They also have more than one quality setting, I normally use the higher quality (12) to save my pics on my computer. If I want to put a picture on the internet, I lower it at quality 8, which is more than enough.
Every time you open and resave a JPG, you add compression, just be careful.
If you want more details on compression, read these Microsoft Informations on images format.
32-Understand the effect of compression on the image?:
We made an animation of an image zoomed at 300%, to show you the difference between a JPG Quality 12 and Quality 1. See how the image change between the two. The cleaner one is quality 12.

33-How many images can you put in your memory card?
With a 21mpx camera and a 16Gb card, you can take about 1900 top quality jpg (8.5MB) images, or about 265 raw (60 MB) images.
34-How big can you print?:
You have to know that most printers print at 300 “pixels per inch” vertically and horizontally.
Our camera give us 21 Mpx images (5616×3744), so the largest we can print is 5616/300=18.72 inches horizontally, and 3744/300=12.39 inch vertically. That gives me a 18.72 x 12.39 inches photo on paper.
Here’s a graphic from improvephotography.com that make is simpler:

35-What image size do you need for Internet?:
A monitor which has a 1920X1080 resolution will only need a 2.07 Mpixel image. (You just multiply the two dimension numbers together).
What if you don’t want the image to fill the screen completely? If you want a smaller image, let’s say a 500×600 image, you will only need a 0.3 Mpx pic.
Just remember:
- 1 000 pixels = 1 K pixels
- 1 000 000 pixels = 1 M pixels
- 1 000 000 000 pixels = 1 G Pixels
Same as for Bytes..
36-Should you shoot in RAW?:
Well in most cases, No. We sold more than 145 000 photos online and never used RAW on any of them.
When to shoot RAW, well if you intend to do very large printout and don’t want to lose any information it’s a good idea. But simply don’t shoot RAW for any internet stuff, your computer monitor can only display 72 pixel per inch, it’s a waste of time and efforts. You just won’t see the difference on the image unless you zoom at 200%, which you will never do unless you intend to print very large..
I suggest you try to print the same image in an uncompressed format and in quality 12 JPG to see the difference. Will you see the difference? Is it worth the extra effort? Just try it.. ????
37-Pay attention to the background
Generally speaking, the background should be as simple and clutter free as possible, so it doesnt pull the viewer attention away from the main subject.
38-Shadows are always lurking around, be prepared to deal with them.
Particularly outdoors, they tend to crop up in the most inconvenient places. Specially under your model nose.
39-Dont be afraid to raise the ISO indoors
You will have more noise, but your images will have less chance to being blurred by movement.
40-Wide aperture is best for portraits
When shooting people or animals portraits , your subject should be the main focus of the picture and the best way to achieve this is to use a wider aperture. This will keep your subject sharp, while blurring out any distracting objects in the background.
Keep in mind that a smaller f/ number means a wider aperture, and wider aperture give you more subject isolation. Some lenses can go as low as f/1.2, but even apertures of f/5.6 can do the trick. To better understand how the aperture affect your images, switch to Aperture Priority Mode (Av or A), and try taking some shots with different apertures.
41-Small aperture is best for landscapes
Landscape photographs require a different approach, because everything from the rocks in the foreground to the mountains in the background should be sharply in focus. So any time youre shooting a scene where you want everything to be fully in focus, you should select a small aperture rather than a large one.
A larger f/ number means a narrower aperture, so go towards f/22 or higher, depending on what your lens allows. Again, using Aperture Priority Mode (Av or A) will allow you to experiment with different apertures, just watch your shutter speed when shooting handheld.
42-The effects of Wetness:
With wetness you can get interesting reflection effects, but it also limits the illumination from your own lightings.

43-When to use Aperture Priority modes
With the Aperture priority mode, you can control the aperture of the lens. It’s practical to control the blurness of the background when you want to isolate your subject. We basically always use this mode.
44-When to use Shutter Priority modes
Shutter Priority mode permit to controls how long the shutter stays open when you take a picture. It’s useful when shooting fast moving objects or persons, It helps freeze the image. You also use it to keep time at a certain duration, when you want to pan a moving object.
45-Use Panning to create movement:
If you want to capture a subject in motion, then use the panning technique. To do this, choose a shutter speed around two steps lower than necessary so for 1/250, we’d choose 1/60. Keep your camera on the subject with your finger half way down on the shutter to lock the focus and when ready, take the photo, remembering to follow them as they move.

46-Less is More:
When there’s too much things in the image, the eyes of the viewer sometimes doesn’t know what to focus the attention on. Keep it simple..
47-Why every pictures you take doesn’t look as good as what you see with your own eyes?
Don’t worry, it’s normal. Here’s a few reasons:
-
Just because you have two eyes, the combined 3D image from both eyes give a much better resolution.
-
Your eyes detect a wider luminosity spectrum than any camera. From Dark to Bright..
-
The eyes combined together have a wider point of view (about 180degrees) than most camera lens, and it’s in 3D for about 70 degrees. Our nose is limiting the eyes 3D perception.
48-Play with perspective
The best way to get a bit more creative with your photography is to experiment with perspective. The exact same scene can often look very different when approached from a different angle, and capturing your subject from above or below may change the whole feel of a photograph.
Not every angle will work for every photography, of course, but youll never know what works and what doesnt if you dont experiment. When shooting animals or childrens, you can try getting down to their level and viewing the world through their eyes.

49-When to use your on-camera flash
On camera flash can sometimes be used during a cloudy day, to add colors to a colorless outdoor scenery. If you use it, find the flash settings in your cameras menu and try to reduce its brightness as much as you can.
Indoor, if the scene is just to dark, you can use the flash. But try to diffuse it with a piece of paper, or try to bounce it on wall or ceiling. Direct in camera flash often gives red eyes effect and/or weird shadows behind the subjects.
50-Ask permission
Most people are glad to model for you when you look like a professional photographer or when they know you. Some people just don’t want to be photographed, but in most case, people are just not comfortable to pose for strangers. By contacting people and asking for permission, you’re giving them confidence in you.
51-Find a photo editing software:
It will allow you to perform basic editing tasks such as cropping, resize, adjusting exposure, white balance, contrast, remove red eyes effect and more.
Most professional photographers use Adobe Photoshop or Lightroom, but if you want something a little less pricey to start with, you can try Photoshop Elements.
52-Know how ISO works:
ISO is the camera sensor sensibility scale. Higher numbers means more sensibility. More senbility means the image need less time to be illuminated and therefore, you can shoot faster.
The only problem is, higher ISO also mean more noise. You have to balance your choice between speed and noise.
Here’s a graphic that show which ISO should be used and when:

53-Learn how to change the white balance:
Standard white balance settings that can be found on most cameras include: Automatic, Daylight, Clouds, Flash, Shade, Fluorescent and Tungsten. Most of the time the automatic setting will do the work, but on rare occasion it’s better to use the manual settings.
When it happens, you just have to select the setting according to the type of light youre shooting in. See the image below:

54-What about the Sun?:
Try to put your subject in shadow area when the sun is harsh, you can always use software later to light it up. You can also put your subject with the sun behind it, and then simply use a burst of flash to brighten it up.
55-Eyes should always be in focus
When shooting portraits, your subjects eyes should be your main point of focus. It’s the most important facial feature, and theyre often the first thing we look at, when looking at a portrait.
56-Should you buy an SLR?
The main advantage an SLR has is its versatility, you can change their lenses and they have more manual settings than Point and Shoot cameras.
Read our other article for more informations on this subject:
57-When to use a polarizing filter:
This filter helps reduce reflections from water, metal, sky and glass. It helps improve the colors of the sky and foliage. The effect is at its maximum in sunny days, when the sun is at 90 degrees (left or right) from your subject. Be careful, these filter have a darkening effect, you will have to over-expose a bit to compensate it.

I suggest you use one when shooting in sunny days, like I do, it helps improve contrast and colors saturation. Be cafeful though, using one with a very wide angle (10-15mm) tend to give uneven and unpleasing effects.
58-Watch the horizon line:
Nothing distract more the viewer attention than having the horizon going downward, especially when standing water is involved.
59-Learn to use the camera Exposure Bracketing:
When you’re not sure about the surrounding lights, it’s a good idea to use the exposure bracketing function of your camera. I use it all the times. The bracketing take 3 photos instead of one: 1 darker by one step, 1 normally exposed and 1 brighter by one step. When reviewing them later, you can choose the one you prefer.
60-Don’t ask people to smile, you can’t force an emotion:
Artificial smiles never look good on picture. Shoot people when they get prepared to be photographed, you have more chance to have natural smiles. You rarely see a model teeth smiling in a magazine, and when they do, they were probably relaxed or in very good mood.
I often tell model not to smile, but tell them something that make them smile. The result is always natural.
61-Models don’t really have to look at the camera:
I always ask models to look at a few different directions. Sometimes, it just give better results when they are looking at your right of left. Models in magazines rarely look directly at the camera.
62-Use Burst mode:
It permit to capture more pictures in a roll, and more chances to get a perfect shot. You can also make amusing animated GIF in photoshop:

63-Experiment HDR Mode
HDR mode improves the lightest and darkest parts of a photo. It expand the luminosity spectrum of a photo and give you amazing results.
A lot of new cameras have the HDR function, but I prefer to make them in a specialized program called Photomatix Pro instead. With this software, you can have more control over the magnitude of the effect. You can play with the in-camera HDR effect for fun, but don’t expect too much from it.
64-How to shoot flowing water:
Waterfalls and rivers add an interesting effect to a landscape photos if you use long shutter speed.
Getting a slow enough exposure usually requires a small aperture, low ISO and low light. However, you can also achieve this in bright daylight by attaching a Neutral Density filter and a polarizing filter to the lens. You can visit Mother’s Nature Network article for more technical details on how to do it.

If you want to freeze splashing water, you have to use a fast shutter speed of about 1/300 sec or faster.
65-It’s never too cold outside to take photos:
In fact, the colder it is, the better. Steam from water or breathing means it is very cold outside. “Make the viewer feel the freezing coldness in your picture”.

66-Learn to do Panoramas:
Most cameras have a panoramic function. Try it, results are always very impressive.

67-Don’t use digital zoom:
Digital zoom only crop a portion of your image and display it. It’s the same as cropping the image after it was taken. It doesn’t really zoom the image like a lens would do. I just disable it..
68-Be careful when taking pictures at the beach or in the snow.
When the surrounding is very bright, most camera will lower the luminosity of the images. You will end up with an image that is too dark. Some cameras have beach of snow setting, make sure you use them. If they don’t, you have to program your camera exposure compensation to let enter more light.
69-Adjust the Camera Diopter:
Everyone’s vision is different, so it’s impossible for manufacturers to set the focus of a viewfinder for everyone. Instead, they provide a diopter that you use to customize the viewfinder to match your visual acuity. You’ll usually find it close to the viewfinder, marked with + and – signs.
70-Know how to use manual focus:
Sometimes, when shooting with a macro lens where focus is critical or when shooting in low light condition, the autofocus just doesn’t work well and you must focus manually. Infrared photography is a good exemple, you have to focus the camera before putting the infrared filter on. It just won’t be able to focus with the filter on.
To set the manual focus, you set to MF the “AF/MF switch” on your lens side. You also have to use the LCD monitor to help you focus. You set to maximum the magnified view of your camera monitor, and select what you want to focus on. You then turn the focus ring on your lens to make the focus.
71-Posing group portraits
When you’re arranging a group portrait, the first thing you’ll probably consider is height, putting taller people at the back and shorter people at the front.

72-Shoot at night:
When shooting at night, you need to use a tripod and disable the image stabilizer of your lens. You have to use the camera timer or a remote control to make sure the camera doesn’t move. The white balance can be a bit tricky, most of the time, the automatic white balance will work just fine and sometimes it won’t. It is suggested to switch it to daylight setting or to use the manual color ajustment, if your camera have one. You can also set the mirror lock function to on to eliminate any movement created by the mirror movement. Removing the UV filter and using a lens hood will help minimize unwanted light coming in from the surroundings. Since you use a tripod, you can lower the ISO setting to basically the minimum (100-150) to reduce the image noise.
73- What is a Hot Pixels
Hot pixels show up when the camera sensor gets hot during long exposures or when the ISO is cranked up to high iso setting like 400 and more. It shows up as a red pixel that you can see at the same spot on multiple pictures. You rarely of barely see them when shooting in daytime.
74-What is a sensor spot?
Sensor spots are caused by dirt on the camera sensor. Since most new cameras have automatic sensor cleaning system, you rarely see them now. But on old DSLR, it was a real pain in the ass. Sensor needed to be cleaned with alcohol after switching lenses a few times. Sensor spots appear as diffused dark round spot in the image. They are easier to find on clear blue sky, like below:

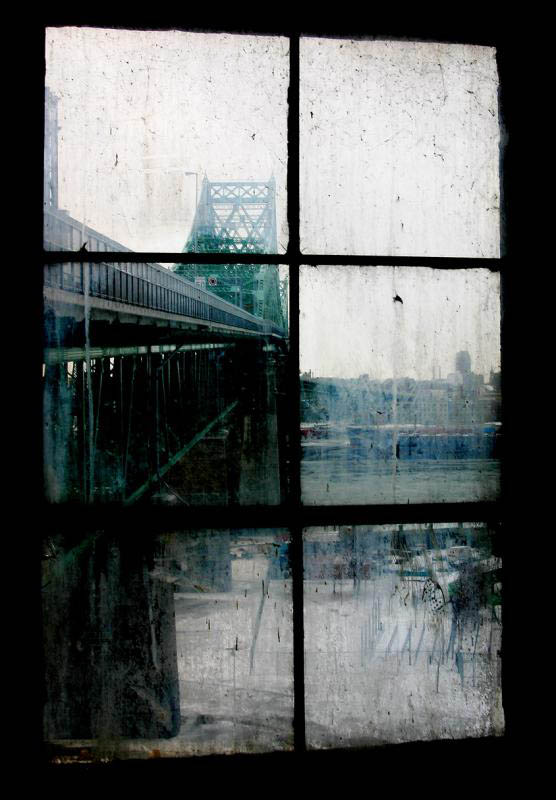
75-Find original Framing for your picture:
76-What is color temperature?
Every colors have a temperature in Kelvin, here’s a graphic that shows them:

77-Play with colors
Sometimes colors accentuate the subject or help focusing the viewer attention.

78-Know when to shoot : Twilight Me
Best Twilight results are made 30 minutes before Sunrise and 30 minutes after Sunset. At these hours the light from the sky has the same intensity as the ones from buildings:

It’s good to know in advance, where the sun will rise and fall. You will also have more lights in buildings at Sunset than sunrise, since less people are sleeping.
79-Shoot Emotions:
Pictures that shows or provoke emotions are always popular with most people.

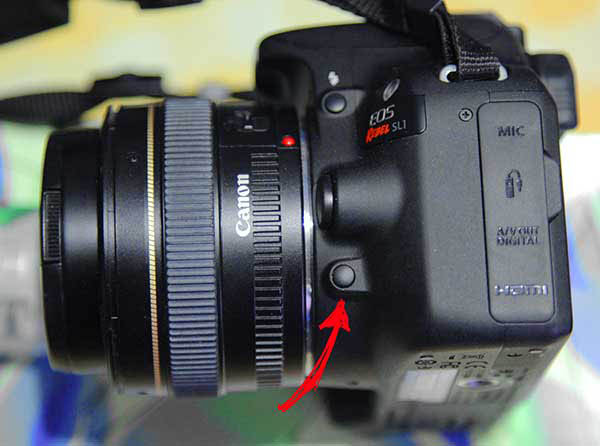
80-Use the DoF preview button.
If you want to know what the background in your photo will look like, you push this button. The image will look a bit darker but you will see how blurred the background will be. If your camera is in aperture mode, you can change the aperture while pushing the DOF button to see the difference in blurring for each apertures.
The depth of field preview button is normally located right under the lens release button.
81-Get a remote control:
Timer is good but sometime when time is critical, it’s just not fast enough. We have both one with a cord and an infrared one. You can buy non-branded ones at low cost at about any store.
82-Know the most common Images problems:
If you want to sell pictures, you have to know the common image problems. You can see a resume in my blog on DSLR cameras.
83-Get comfortable with your equipment
Get to know your camera perfectly, so you don’t waste precious time searching for camera functions or settings.
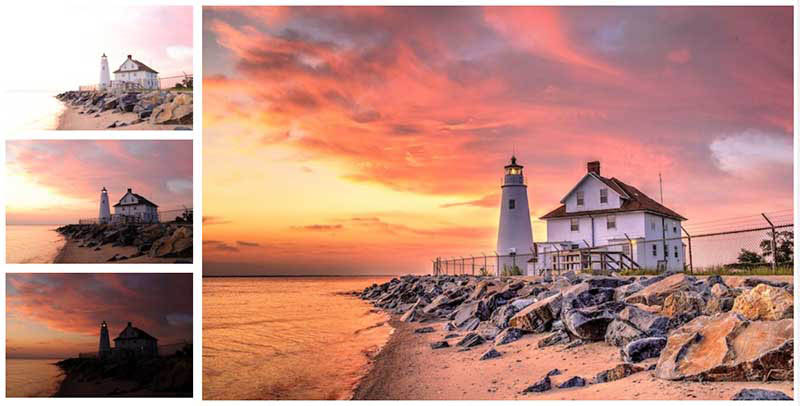
84-Learn to ajust your camera contrast and saturation settings:
On our camera, we can set 3 different camera settings for contrast and saturation. When shooting something that has a lot of contrast, like a city at night, we set the camera for minimum contrast and normal saturation. When everything outside seem gray, it’s time to boost the contrast and saturation, to have a more interesting result.

85-Experiment different types of cameras:
Apart from my DSLR, I have a 360 degrees camera ( Ricoh theta S ) that we love. we have two small cameras on a setup that I use to take stereoscopic pictures. We have a Waterproof Point and Shoot that We use when playing very close or inside the water. We also have a thermal infrared camera that we use for home isolation testing. And, of course, we also have a Gopro for amusing videos and timelapse.
86-Test your camera settings and lenses.
When you’re not taking pictures, spend time testing your different camera settings. You can test your lenses, your iso noise, your white balance, etc. You will know better how to use your equipment if you know its limitation.
87-What is a Model Release:
If they intend to sell their pictures, Professional photographers need an authorization from their models, that’s what we call a Model release. It is needed for every persons in the picture, if it’s for commercial purpose. It is not considered obligatory for editorial use (News).
88-What is a Property Release:
Some building are right protected, you need an authorisation to sell image where they are the main subject. That’s what we call the property release.
89-What is a fisheye lens:
Fisheye lens take 180 degrees pictures, but the resulting images are round instead of the rectangular. See image below:

90-Always use the lens Hood:
It helps keep unwanted lights from coming in the camera, but it also protect your lens, if the front of your camera hit something. It also make it more difficult to put a finger on the front lens and put dirt on it.
91-Get a shoulder held tripod bag:
Buy one now and thank me later. It just make using your tripod way much easier, you can bring it with you for a long walk or in a bicycle ride. You put tripod in and slip it over your head and shoulder and you’re ready to go. You don’t even have to remove it to take your tripod. You slip it in front of you, unzip it, and take the tripod.

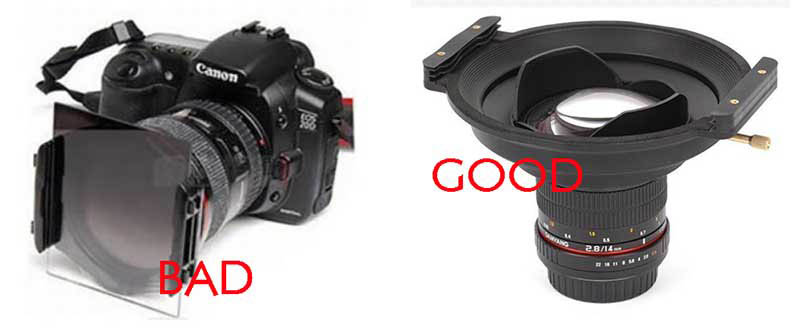
92-Do not buy “Vertical” Colors filters holder:
Buy Horizontal ones instead and the horizontal filters that fits in them. Why? If you buy vertical ones,you’re pretty much limited to vertical shots. If you buy horizontal ones, you can do both, vertical and horizontal shots. If you try to use vertical ones on horizontal shots, the filter holder side clamps with darken the side of your images and made them useless. See image below to know which one to look for:
93-Stay well organized:
Keep all your equipement in an organized way and all your pictures in a well structure directory setup. By being organized, you spend less time searching for things and more time doing profitable ones.
I have many different cameras, they all have their own batteries and chargers. In a drawer, I put every cameras with their own chargers and batteries together so I can find them quickly if I need to.
All my photos are classified by years, months and days. I can easily find them as well.
94-Get a neutral grey card for white balance ajustment:
Neutral grey card are use to neutralize lighting. It’s used when the camera is not doing a great job neutralizing it. You set your camera to automatic white balance, and shoot your Grey Card under the lighting you want to use. Next, you set your camera to personalized white balance and select the image you just shoot with the grey card. Now every new photos will be color corrected for this lighting.
I suggest you use a black pen and make a big X on your grey card, so the camera can focus more easily when shooting it.
95-If your camera fails, turn off power and remove the battery:
Sometimes, when electronics fails, you have to reset it. The best way to do it is to remove power completely, including the battery. If you don’t remove the battery, the reset might not be complete. The same thing apply to laptop computers, phones, cameras and basically everything working with a battery.
If it doesn’t help, try to reset the camera settings. After that, if you still have a problem, you might consider sending it for repair.
96-Always power off the camera before changing lenses:
A friend of mine made this mistake once, he forgot to turn off the camera before changing his lenses. The lens he put was not from the same manufacturer as his camera, I don’t know if it makes a difference though, but when he tried to use the camera after that, it wasn’t focusing anymore. He tried to put back the original lens or my own lenses, without any improvement. I put all his lenses on my camera and they were all working fine. So make sure you power off the camera before changing lenses, if you don’t want this to happens to you.
97-Shoot everything around you:
Photograph your backyard, your house, your friends, your village and city. Try to be unique and creative with your approach. Dont stop shooting until you have your ultimate image. Always carry a lot of memory cards so you dont have to worry about how many images you can take.
98-Always learn new things:
Always take time to learn new techniques and try new material. Photography is a skill, it can always be improved with practice and testing.
99-Make backup of your pictures:
You must protect your images, and having a backup elsewhere is a good idea. The apartment of one of my friends photographer was robbed while she was travelling a few weeks ago. They took all her photo Equipment and her pictures storages. The equipement was paid back by the insurance, but she lost all her photos that took years to take. Gone forever..
100- “Whatever you do, Result is king”:
This is probably the most important of my Essential Photography Tips: Whatever you do to a picture, the most important thing to consider is the result. Don’t worry about people whinning that you’ve photoshoped your image, every professional photographers use photoshop to improve theirs. The only person you really need to impress is yourself. ????
101-and Finally..Just enjoy it.
That’s what will keep you going for more…
